Is Replacing a Belt Tensioner Hard?
Replacing a belt tensioner is moderately difficult and typically requires mechanical knowledge. Tools and a vehicle-specific manual are necessary for the task.
Many car owners face the challenge of maintaining their vehicles, and replacing a belt tensioner is one task that can arise over the lifespan of a car. The difficulty level of this repair can vary depending on the model and engine layout but generally falls within the intermediate range of DIY automotive tasks.
This maintenance job is crucial because the belt tensioner ensures that the serpentine belt – which drives multiple peripheral devices in your car such as the alternator, A/C compressor, and power steering pump – remains tight and functional. Without a properly working tensioner, these systems may fail, leading to more extensive repairs. Carrying out this replacement requires a good set of tools, a clear understanding of the engine components, and ideally, a guide specific to your vehicle’s make and model. Owners with a bit of mechanical inclination, armed with the right information, can often tackle this repair with confidence.
Assessing The Challenge
Assessing The Challenge of replacing a belt tensioner can seem daunting. It’s critical to know what you’re up against. Spot the warning signs early on. Ensure you have the right tools and a good grip on necessary skills.
Symptoms Of A Failing Belt Tensioner
Recognize these symptoms to prevent more damage:
- Loud squeaking or chirping noises
- Belt frays or cracks
- Battery warning light
- Engine overheats
- Power steering and AC issues
Tools And Skills Required
Having the right tools makes the job smoother:
| Tool | Use |
|---|---|
| Ratchet and Socket Set | Remove bolts |
| Torque Wrench | Apply correct tension |
| Serpentine Belt Tool Kit | Relieve tension and remove belt |
Basic mechanical skills are a must:
- Ability to follow a belt diagram
- Understanding torque specifications
- Familiarity with vehicle parts

Credit: www.quora.com
Preparation Steps
Before diving into the task of replacing a belt tensioner, taking the right preparation steps is crucial. Proper preparation ensures a smooth process and guarantees safety. This preliminary work involves a series of safety measures, gathering the tools you’ll need, and getting the vehicle ready for the operation.
Safety Precautions
Safety should always come first. Before starting any work on your vehicle, take these important safety steps:
- Wear protective gear such as gloves and eye protection.
- Ensure the car is parked on a flat, stable surface to avoid it moving.
- Disconnect the battery to prevent electrical short circuits.
- Keep a fire extinguisher handy, just in case emergencies arise.
Gathering Necessary Tools
Gathering the right tools makes the job easier and faster. Here’s a list of the tools commonly required:
- Ratchet and socket set
- Torque wrench
- Serpentine belt tool or a long-handled wrench
- Pry bar
- Replacement belt tensioner
Vehicle Preparation
Proper vehicle setup is key to a successful tensioner replacement. Follow these steps for vehicle prep:
- Cool down your car if it has been running. Work on a cold engine to avoid burns.
- Locate the tensioner by referring to your vehicle’s service manual.
- Use wheel chocks to secure the vehicle from rolling.
- Have enough lighting to clearly see the engine and the belt assembly.
Belt Tensioner Replacement Process
Replacing a belt tensioner is an essential maintenance task that keeps a vehicle running smoothly. The process may seem daunting, but it’s quite manageable with the right tools and knowledge. Follow these steps to ensure a successful replacement of the belt tensioner.
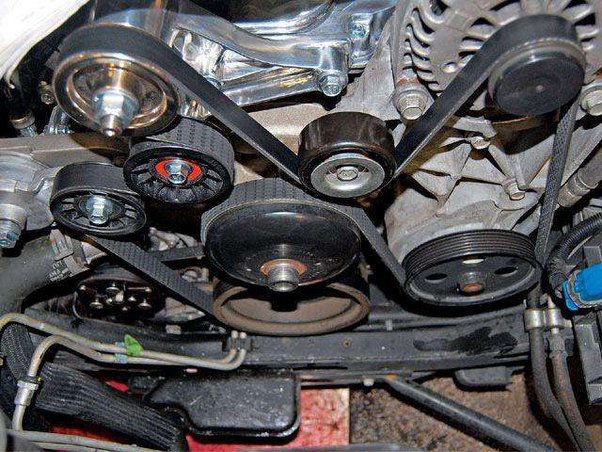
Locating The Belt Tensioner
The first step is identifying where the belt tensioner is on your vehicle’s engine. It’s usually mounted on the front part of the engine block. Look for a pulley attached to an arm that keeps the serpentine belt tight.
Removing The Old Tensioner
Before removing the old tensioner, remember to disconnect the car’s battery. Safety comes first!
- Release tension: Rotate the tensioner using a wrench to relieve tension on the belt.
- Remove the belt: Slide the serpentine belt off the tensioner pulley.
- Unbolt tensioner: Use the appropriate socket to unbolt the tensioner from the engine.
- Extract tensioner: Carefully remove the tensioner from the engine bay.
Installing The New Tensioner
With the old tensioner out, it’s time to install the new one.
- Position the new tensioner: Place the new tensioner in the same spot as the old one.
- Bolt in place: Securely fasten the tensioner to the engine block.
- Reinstall the belt: Loop the serpentine belt back over the pulleys according to your engine’s routing diagram.
- Test tensioner movement: Ensure the tensioner can move freely to maintain proper belt tension.
- Reconnect battery: Once secure, reconnect the battery and start the engine to test the installation.

Credit: www.reddit.com
Common Pitfalls And Tips
It’s common for DIY car maintenance enthusiasts to encounter challenges when replacing a belt tensioner. Knowing these pitfalls and implementing professional tips can streamline the process. This section dives into the typical issues and offers guidance to overcome them effectively.
Troubleshooting Installation Issues
Installation issues can arise during the replacement of a belt tensioner. Here are some troubleshooting tips:
- Ensure compatibility between the tensioner and your vehicle model.
- Double-check the tensioner’s position, as incorrect alignment can cause malfunctions.
- Inspect the routing of the serpentine belt to avoid slippage or damage.
- Use a torque wrench to maintain proper bolt tension, preventing loosening over time.
Avoiding Damage To Other Components
While replacing a belt tensioner, caution is necessary to avoid damage to adjacent parts. Follow these tips:
- Protect electrical connectors and wiring harnesses from accidental impact.
- Keep a clear workspace to prevent tools from scratching surrounding areas.
- Slowly release tension to prevent the belt from snapping back and causing harm.
- Review a service manual for specific guidances on your vehicle’s engine layout.
Post-installation Checks
After you replace a belt tensioner, some checks are key. These checks ensure your car stays safe on the road. Let’s look at the steps you should take once a new belt tensioner is in place.
Belt Alignment And Tension
Correct belt alignment and tension are crucial for your car’s performance. A belt that’s not aligned or too tight can cause big problems. Here’s how to check them:
- Inspect the belt path – It should follow the correct route around the pulleys.
- Check for proper tension – Use a tension gauge if possible. The belt should have just enough give.
Testing The Vehicle
Testing the car after installation is essential. Start with these steps:
- Start the engine – Listen for any unusual noises.
- Take a short drive – Feel for vibrations that suggest a misaligned belt.
Monitoring For Early Signs Of Wear
Stay ahead of future issues by watching for wear signs. Key tips include:
- Look at the belt edges – Fraying or cracks are bad news.
- Check tension regularly – A belt that loosens quickly needs attention.
Frequently Asked Questions For Is Replacing A Belt Tensioner Hard?
How Difficult Is Belt Tensioner Replacement?
Replacing a belt tensioner can range from moderate to challenging, depending on your mechanical skill level and the specific vehicle model. Generally, it involves loosening bolts, removing the old unit, and installing a new one, which could take a couple of hours.
Can I Replace A Belt Tensioner Myself?
If you possess basic mechanical skills and have the right tools, you can replace a belt tensioner yourself. Ensure you follow a detailed guide or manual for your vehicle to avoid mistakes and ensure a safe and correct installation.
What Tools Are Needed For Tensioner Replacement?
Common tools required for replacing a belt tensioner include a socket set, wrenches, screwdrivers, and sometimes a torque wrench. A serpentine belt tool can also be helpful to release tension on the belt during the process.
How Long Does Changing A Tensioner Take?
The time it takes to change a belt tensioner varies but typically ranges between 1 to 3 hours. This duration can be influenced by the complexity of the vehicle’s engine bay and your familiarity with the process.
Conclusion
Replacing a belt tensioner can be straightforward for those with mechanical aptitude. All it takes is the right tools and guidance. Be sure to follow safety procedures and consult a professional if in doubt. Regular maintenance checks can help prevent unexpected failures.
Keep your vehicle running smoothly with this essential upkeep.